Skip to content

SharePoint Guidance V3 Released Yesterday

Generally speaking, I don’t post blogs about news releases. I figure that if you’re reading this blog you’re reading other SharePoint blogs and you’ll know when the product releases to manufacturing or when some new service pack is released, however, today’s news – that the Microsoft Patterns and Practices group released version 3 of the SharePoint Guidance. Why is that different? Because for me it’s been a 9 month journey into trying to create the best advice for creating spectacular solutions on top of SharePoint – and I believe we’ve done it. I’ve blogged in the past that I’ve been partnering with the p&p group for a while (here, here, here, etc.) . This wave started in August or September of last year. (It sort of depends upon what you consider the start.) We started talking about what things were going to be important for SharePoint 2010. It was an awkward place for the p&p group – and for me. I’m used to people asking me to document proven practices after they’ve been proven. At the same time we both recognized the need to provide a firm foundation of guidance when the product released.

Over the last nine months we’ve had conversations with advisors, experts, and architects for SharePoint to talk about what the best practices should be in several different areas. We started with execution models – how you get stuff done in SharePoint. We cover Sandbox and we cover workflow. We cover timers and web parts. The idea is you’ll get a chance to pick the right execution model for your application. We cover data models including when to use BCS – and when not to. We also cover client and what you should plan on doing in Silverlight and Ajax. While the guidance is by no means comprehensive or perfect, I can say with great confidence it’s the best work yet.

Whether you’re an architect, a development lead, or just a developer on a SharePoint project I’d highly encourage you to read the guidance cover-to-cover and discover what other people are calling essential.

Making SharePoint Work with Workflow

Today I had the pleasure of delivering a eLearning seminar on Making SharePoint Work with Workflow. It included three separate sessions:

  • SharePoint 2010 Workflow with SharePoint Designer and Visio
  • Extending SharePoint Designer Workflows
  • Developing Workflows with Visual Studio

The samples I used in the presentation were:

The presentation deck is available as well (in PDF format).

IndyTechFest and Professional SharePoint Development

This last Saturday I had the pleasure of spending some time with about 40 folks to talk about Professional SharePoint Development at IndyTechFest. It was a sort of ad-hoc presentation because I forgot to update the title when I updated the abstract. As a result some folks were wanting to see SharePoint Site Lifecycle and others were wanting Professional SharePoint Development.

The Professional SharePoint Development part of the talk was focused around my work on the 10232A course for Microsoft Learning. The course it titled “Designing Applications for Microsoft SharePoint Server 2010”. I had recently delivered a train-the-trainer session for MCTs and used that deck as an outline for our conversation. It was a lot of fun talking about the decisions that professional developers need to be aware of. A lot of what we talked about can be found in our work in progress for the Microsoft Patterns and Practices SharePoint Guidance Version 3 (You can find our previous guidance on the Microsoft web site at http://www.microsoft.com/spg.)

I also got to cover some of the SharePoint Site LifeCycle – Creating and Archiving Sites deck that I’ve used at a few conferences. It’s a lot of fun to deliver that deck as well because we get to talk about how workflows can be used to make light work of the challenges of both provisioning and archiving sites. Along the way, I address the need for a replacement site directory since in SharePoint 2010 the site directory has been depreciated.

Overall the event was great with several hundred people and flying boomerangs … If you’re local to Indy you’ll want to make sure that you come next year. It was a great time.

lock

Bad SSL Certificates and Browser Woes

I was troubleshooting some relatively minor SSL changes that had reportedly worked before but no longer worked. After switching back to old certificates and it still didn’t work I was mystified. It looked like it was working. I could telnet to the port so I knew that HTTP.SYS/IIS was answering. However, the browser refused to return anything on HTTPS.

I ended up breaking out Network Monitor 3.3 and getting a capture. What I saw in the packet capture was odd…

  1. ARP for the target address. (Good we’re starting from scratch)
  2. TCP connection negotiated (Good, we have a channel.)
  3. SSL Negotation and Key Exchange – with a TCP FIN flag set. The FIN flag is “I’m done let’s close this channel.” (This isn’t good. We shouldn’t negotiate and then turn around and close the channel.)
  4. Steps 1-3 repeated except instead of a FIN flag I see a TCP RST flag. That’s a “I’m not talking to you any more – go away” In other words, the connection is terminated abruptly. (This is really bad. This is the point at which the client knows there’s something horribly wrong.)

After some work we realized that the SSL certificates were self-signed and there was something wrong. We moved to a certificate from a CA and the servers started accepting connections on SSL without any more issues. I’m not clear exactly what the heck the problem was with the certificates, but replacing them definitely resolved the issue.

HTTP 400, Kerberos, Bad Request, MaxTokenSize, TokenSz

We turned on Kerberos for a client this past weekend and one of the gifts that we got was that some of the users couldn’t log into the portal. Other users weren’t able to post a form to the server. They would get a HTTP 400 Bad Request.

Initially it was thought that the Kerberos ticket might be getting larger than the MaxTokenSize (See KB327825). After I chatted with my friend Laura Hunter I was pointed to the TokenSz utility. It will show you the token size of the current user. With this information I found that for the most part the users had token sizes of ~3K. One user had a token size of 8194 bytes. So knowing that the token sizes were much smaller than the 12K limit that MaxTokenSize defaults to I had to do some more digging.

Ultimately, I found that HTTP.SYS has a smallish default buffer size for incoming requests and large Kerberos tickets can actually exceed the available size for this buffer. Luckily KB2020943 shows you the registry settings you can change to increase the buffer size of HTTP.SYS. There’s a reboot required after the change but after that the users were able to login. For our environment we felt like a MaxFieldLength of 25K was plenty of headroom for our needs.

CPU Transistor Count Over Time

I recently had to generate a graph for Moore’s Law which plots CPU transistors over time, I thought the end result looked interesting so I wanted to share it:

The line is a bit more varied than most you see because I included AMD, Cyrix, and a few other CPU vendors. I also noticed that some of the data I was using included onboard cache in the transistor count and some didn’t. However, I think the graph is interesting because it does show how we’ve roughly doubled the transistors on processor every 18 months-2 years as Moore predicted. Of course, we’ve stopped increasing our speed and now we’re focused on driving more cores onto the chips – and therefore forcing developers to think about multi-threading their applications.

Content Organizer in SharePoint 2010

There are so many new features and enhancements in SharePoint 2010 that it’s hard to keep track of all of the great things going on. One of the interesting new enhancements is the Content Organizer. It started out its life in SharePoint 2007 as the records routing available only to records centers. However, In SharePoint 2010 it’s been set free for use in any type of site. There are a few unique ways that it can be used – and a few quirks you should be aware of if you want to leverage it in your environment.

The Content Organizer feature is a site feature. Once activated a new library – called the Drop Off Library – is created and two new links are added to the Site Settings menu – Content Organizer Settings and Content Organizer Rules. The settings allows you to restrict uploading to libraries that content organizer has rules for, controls whether content organizer rules can target other sites, controls additional folders being created once a specified number of items have been added to a folder, as well as some other settings. The content organizer rules is more interesting because it allows you to establish a set of rules as to where the content should go.

To start with you need to know that Content Organizer works with content types. That means you’ll need to create content types for the types of content that you want to route. Technically, you could use document but that’s not going to be very interesting. Once you have selected a rule in a new content organizer rule you can specify additional conditions. For instance, if you wanted to place expense reports that were for more than $10,000 in a different location (to drive a different workflow) you could specify that the total value is greater than $10,000 for the rule. The final part is to specify the target location and potentially the additional sub-folder based on the attributes. This is the powerful part, you can automatically route documents into folders based on the metadata in the item.

This feature can be leveraged to automatically route forms to the correct location based on content type – and a field in the content type. When you develop your forms in Microsoft Office client applications you can have fields from the document automatically populate columns of metadata in SharePoint – therefore providing the content organizer something to route on. You can learn more about how to create Office client templates that promote fields in my whitepaper written for SharePoint 2007 Managing Enterprise Metadata with Content Types. This shows you how to do this for Word documents. You can do similar things by promoting fields InfoPath forms. By doing this the user simply fills out the form and submits it. SharePoint does the work to move it into the right document library and folder.

One of the interesting side effects to this approach is that the documents aren’t moved immediately from the drop off library to their respective target. Somewhere along the way the process for providing the required metadata is skipped and as a result instead of an event receiver kicking off and moving the document, the system waits for a timer job to run which looks for items in the drop off libraries of the various sites that have been created and processes any of the items in the drop box – if possible. You can change the schedule – or force running of the Content Organizer Processing by going into Central Administration, selecting Monitoring, and Content Organizer processing. The default schedule of once a day may not be enough if you plan on heavily leveraging this feature.

You can also trigger processing of individual documents, if you were to go in and save the properties of the document, so it’s possible to get the content organizer to route an individual document immediately.

If you want to create a simple test case, that’s easy enough to do:

  1. Create a new content type built upon the document content type.
  2. Name the content type something like Office Document
  3. Add the ‘Author’ site column to the content type.
  4. Activate the Content Organizer feature
  5. Create a target library called ‘Documents’
  6. Add the Office Document content type you created to target library and to the DropOff library created by the content organizer.
  7. Remove the document content type from the DropOff library so uploaded documents default to the Office Document type you created.
  8. Create a content organizer rule (Site Actions-Site Settings-Content Organizer Rules) that routes Office Documents to the Documents library and creates folders by Author with the format of just %2.

Now when you upload word documents to the DropOff library, the author field will be automatically populated for you from what was in the document. The content organizer will see the content and route it to the ‘Documents’ library and create a sub-folder for the author’s name based on the rule you created.

Of course, you can create more complicated scenarios where you’re using Quick Parts to capture data in your Word document and routing based on that information, but this is a quick way to leverage the content organizer.

Don’t Deactivate that Site Template Solution

It’s open season for hunting down SharePoint 2010 bugs and I’ve found a particularly ugly one. I created a site from a site template, and when I went in to the solution gallery and deactivated the solution (after the site was created) the solution gallery began throwing an exception:

[NullReferenceException: Object reference not set to an instance of an object.]
Microsoft.SharePoint.WebPartPages.ListViewWebPart.PrepareContentTypeFilter(SPList list, Hashtable[] excludedTransformers) +176
Microsoft.SharePoint.WebPartPages.ListViewWebPart.GenerateDocConvScriptBlock(SPWeb web, SPList list) +482
Microsoft.SharePoint.WebPartPages.ListViewWebPart.OnPreRender(EventArgs e) +1957
Microsoft.SharePoint.WebPartPages.WebPartMobileAdapter.OnPreRender(EventArgs e) +78
System.Web.UI.Control.PreRenderRecursiveInternal() +11025422
System.Web.UI.Control.PreRenderRecursiveInternal() +223
System.Web.UI.Page.ProcessRequestMain(Boolean includeStagesBeforeAsyncPoint, Boolean includeStagesAfterAsyncPoint) +3393

The specific steps are really simple…

  1. Create a blank site.
  2. Save site as a template.
  3. Create a new site collection but don’t establish a template
  4. Upload the template created in step #2 to the solution gallery and activate
  5. Create the site with the template.
  6. Go to the solution Gallery and deactivate the solution.

If you want or need to get back to a partially useful state you can do the following steps in the SharePoint Management Shell..

$site = get-spsite http://localhost/sites/mysitehere
$solutions = $site.Solutions
$solutions.Add(1)

The moral to this story is don’t deactivate the site template that you created a site from (at least not at the moment). In SharePoint 2007 you could remove a site template’s STP file once the site was created because the STP file was essentially a macro that replayed the creation steps over the existing site definition. However, this isn’t the case with the new WSP format. The source of the items including content types is tracked, and may be removed if you remove the site template.

CS0016: Could not write to output file with SharePoint

I was at a client today and they were having all sorts of errors in SharePoint. One of them was that central administration pages were returning ‘unknown error’. When I turned on debugging I saw a server error in application with these details…

CS0016: Could not write to output file ‘c:\WINDOWS\Microsoft.NET\Framework\v2.0.50727\Temporary ASP.NET Files\root\242d0ff4\3604ddcb\en-US\App_GlobalResources.aaqxxojv.resources.dll’ — ‘The directory name is invalid.

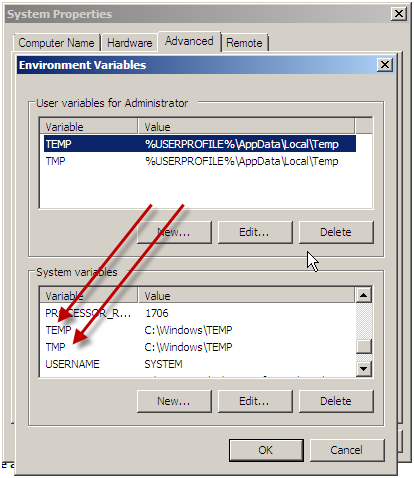
It was quick enough to find a Microsoft KB article (825791) for CS0016. It points to the fact that there may be a bad TMP or TEMP directory setting. We went into the service and manually set the TMP and TEMP variables in the profile. However, the problem didn’t go away. After further digging we changed the TMP and TEMP at the system level – because we discovered that someone had set the system values to an invalid directory. When we changed the system level setting to a valid directory the problem went away.

XML Invalid Data and Byte Order Marker

While working on some InfoPath and Workflow I got bit again by the Byte Order Marker and I felt like I should document what’s going on. I was getting an exception… “The data at the root level is invalid. Line 1, position 1.” Here’s why:

The XML encoding that InfoPath uses is UTF-8. UTF-8 will make the first byte of the file (when decoded with UTF-8) a byte order marker. When XmlDocument sees this it’s confused. It expects the XML tag to appear at the very first character of the string you provide it. It’s simple to deal with – but frustrating to find. This code create a new XmlDocument, extracts the file contents from SharePoint, and loads it into the document.

XmlDocument wfDoc = new XmlDocument();

Byte[] fileBytes = wfFile.OpenBinary();

string fileAsString = (new System.Text.UTF8Encoding()).GetString(fileBytes);

wfDoc.LoadXml(fileAsString.Substring(1)); // SKIP Byte Order Marker @ beginning of file

A better approach is to hand off the stream to XmlDocument:

XmlDocument wfDoc = new XmlDocument();

using (Stream wfFileStrm = wfFile.OpenBinaryStream())

{

wfDoc.Load(wfFileStrm);

}

This will load fine without stripping the Byte Order Marker – but in my case, this isn’t supported in SharePoint Sandbox code because the System.IO.Stream type isn’t allowed.

Recent Posts

Public Speaking